Efficient Deployment for Personal Projects
Introduction
Nowadays, the selection of a production environment and deployment strategy often depends on the platform in use. As a Drupal developer, my focus is primarily on Drupal-based websites, although the principles I'll discuss can be applied to numerous other frameworks and CMSs.
When working with clients, the choice of deployment strategy often depends on their preferences. Some clients have clear-cut requirements for using platforms like Pantheon or Acquia, which simplifies the configuration process on our end. Others prefer AWS services like Fargate or Elastic Beanstalk, or they may have a dedicated on-premises server that requires a more bespoke setup.
For personal projects, the choice is broader (as you have more freedom) but not without constraints. Factors such as budget 💰, time ⌚, and other considerations must be taken into account.
.png)
In the past, I manually set up everything on a DigitalOcean droplet for my projects. However, this approach was labor-intensive and had several disadvantages, including a lack of inventory tracking, no isolation between applications, and lack of hardening (improved security), to name a few.
To streamline this process, I turned to Ansible to automate some tasks and to do the initial provisioning. While this saved some time, it still required a significant investment, and this was not justified - especially for projects that weren't "state of the art" and had to run somewhere.
Recently, I moved a project to a new server and opted to use Docker Compose for running all production services. While I still used some basic Ansible roles for host system hardening, the majority of the components and services ran on Docker.
This approach offers several advantages: each container runs in isolation, which enhances security; new services can be added without disrupting existing ones; deploying new app versions is simpler and quicker, and because the host system doesn't need to be provisioned and configured for each service. The downside includes a slight performance overhead and potential complexity when containers share volumes.
Overview of a Docker Compose setup
Here are the steps in the nutshell:
- Get an instance (DigitalOcean Droplet, Hetzner Server or AWS EC2).
- Install some basics (to run Ansible, use Git, etc.)
- …clone your setup code (which contains: ansible playbooks, docker-compose.yml, nginx vhost configs, php configs, etc)
- Use ansible to provision the missing stuff (i.e. Docker).
- Harden (secure) the instance (host) using Ansible role.
- Bring your system to life by running: docker compose up -d
- Debug and fix broken things 😂

I have prepared a template that you might want to use for your setup (or inspiration from), I’ll cover the file-folder structure and will explain how it all works.
├── ansible
│   ├── main.yml
│   └── requirements.yml
├── app-settings
│   ├── mysql-conf
│   ├── scripts
├── certificates
│   └── docker-compose.yml
├── docker-compose.dev-override.yml
├── docker-compose.prod-override.yml
├── docker-compose.stg-override.yml
├── docker-compose.yml
├── .env.sample
├── .gitignore
├── host-settings
│   ├── nginx
│   └── scripts
└── README.md
Here’s a rundown of the general layout:
- The Ansible folder - like mentioned earlier, is responsible for installing the basics (provisioning the host) and hardening (securing it).
- The Certificates folder - contains a small docker-compose for obtaining the certificates with LetsEncrypt and Cloudflare (if your domain is managed via Cloudflare, if not, ignore this one).
- The App-settings folder - contains various settings used in services (php, nginx, etc)
- The Host-settings - contains some settings used on the host-system (deployment scripts, nginx proxy configs, etc);
- The .gitignore and .env.sample - to ignore folders that might/will be created, and .env file for storing secrets.
- And lastly, we have our docker-compose.yml and various flavors of docker-compose.override.yml files.
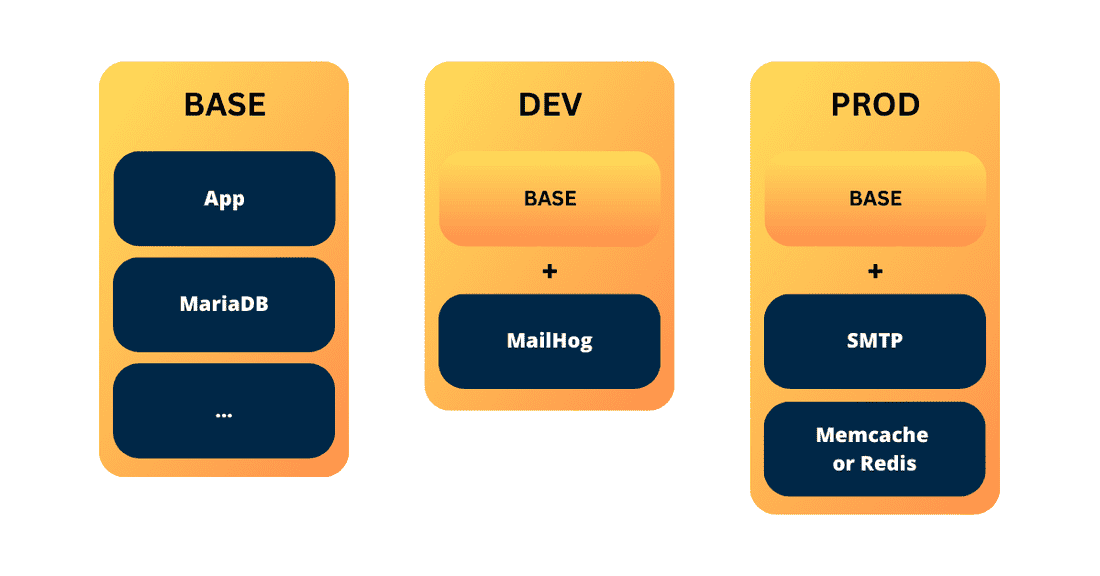
This setup allows us to quickly define different flavors of the setup: local vs. development vs. staging vs. production environments. The main ingredients go into main docker-compose.yml while the environment-specific ones go to docker-compose.{env}-override.yml.

It's important to note that I’m using an NGINX on the host system, which proxies requests into the containers below. This is an optional extra step, but it also allows for scenarios where you share one host system for more than one setup (i.e., if you want to have development and staging running on the same machine) or if you want to co-share the host between completely different applications.

Concrete example: Setting up a microservice with Docker Compose
Let’s set up a micro-service, using this approach, and specifically, adopting the previously given template.
Step 1. Get an instance & Prepare.
For this example, I recommend using Hetzner as they provide affordable prices and have a user-friendly UI. However, you can choose any other service provider that offers a Linux system. In my case, I'll be using Ubuntu. Here’s my referral link (you get 20$ worth of credit).
In addition, create a fork of the template repository or set up your own repository and use the template as inspiration. This will allow you to have your own private repository named "your-project-deployment" or "your-project-setup".
Template: https://github.com/Nikro/docker-compose-template
Template App: https://github.com/Nikro/docker-compose-template-app
Step 2. Basics & Ansible.
Regardless of what you'll be building, there are some basic tools (python, git, etc) and configurations that need to be installed and set up on the host system. Additionally, securing the host system is essential.
First, make sure you have added your public key when creating the instance.
Install the following basics: wget, curl, git, and ensure that Python 3 is installed and running, along with pip. You may want to set Python 3 as the default Python version:
sudo update-alternatives --install /usr/bin/python python /usr/bin/python3 1Next, install pip:
Install Ansible:
sudo python -m pip install ansibleThen, install the dependencies:
ansible-galaxy install -r ansible/requirements.ymlIf everything goes well, you can now secure the system by running:
ansible-playbook ansible/main.ymlRunning this playbook will:
- Secure the host system (you can explore additional variables in the dev-sec/ansible-collection-hardening repository)
- Install Nginx and copy the host reverse proxy configuration and placeholder
- Install Docker
- Adjust UFW (Uncomplicated Firewall) rules
You can extend the provisioning according to your specific needs, but these are the basics.
Step 3. Dockerize your App.
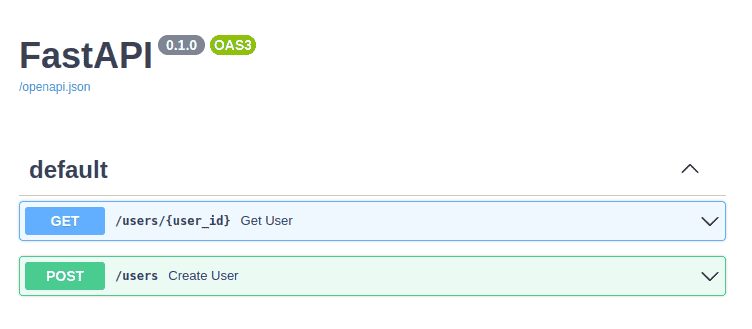
Since we're discussing deployment, I assume you have a custom codebase that you want to deploy. In my example, I have a simple FastAPI-based microservice written in Python. This microservice creates users, stores them in a table, and returns the users when queried.

You can find the code and the CI/CD workflow for this app at the following link:https://github.com/Nikro/docker-compose-template-app
The app itself is simple (although it took me a while to install mariadb properly), with the main functionality contained in main.py. The Dockerization process is explained in the Dockerfile, which installs all the necessary dependencies and runs the server on port 8080.
Here are some tips on how to dockerize your own app:
- How to Dockerize - https://hackernoon.com/how-to-dockerize-any-application-b60ad00e76da
- Some best practices - https://dev.to/techworld_with_nana/top-8-docker-best-practices-for-using-docker-in-production-1m39
- More best practices - https://snyk.io/blog/10-best-practices-to-containerize-nodejs-web-applications-with-docker/
- More best practices - https://sysdig.com/blog/dockerfile-best-practices/
To test the local image build process, you can run the following command:
docker build -t demo-app .Once you're satisfied with the build and it completes successfully, you can proceed to the next step, which is automating the build process. You can achieve this by creating your own .github/workflows/build.yml file or using the one from the demo app.
This will automatically build and push an image as a github package, so you don’t have to (on every push).
Step 4. Build your docker-compose files.
The docker-compose.yml file in our setup currently includes two services: mariadb and app. It serves as the foundation of our configuration. However, if you have additional services like MailHog for development or Redis/Memcache for production, you can add those services in a separate file called docker-compose.dev-override.yml.
The goal is to copy the docker-compose.dev-override.yml file to docker-compose.override.yml on the development server. The override file complements the base configuration with extra services. You can also disable base services if necessary or add additional parameters and details to them.
It's important to note that we are using our custom GitHub package for the app service. If you are using a private repository and private packages, you'll need to address any access issues and log in to ghcr.io accordingly.

Once you have completed your YAML files, you can try them out by running the command docker compose up. This command will start the defined services and bring up your microservice environment based on the Docker Compose configuration you've created.
Step 5. Configuring nginx on host (proxy).
There is a file called proxy_example.conf located in the host-settings/nginx directory. This Nginx configuration file is responsible for proxying requests to your app container. During the execution of the earlier ansible playbook, this configuration file is copied to the appropriate location.
Using Nginx as a reverse proxy provides more control over the request handling process. For example, you can set passwords for specific sub-domains, manage SSL certificates, and handle other aspects of request routing.
In the case of this example:
- The microservice container runs the FastAPI application on port 8080.
- The docker-compose configuration maps localhost:8081 to the container's port 8080.
- Nginx listens on port 80 (HTTP), which is also one of the ports enabled through the UFW firewall, and proxies the incoming requests to port 8081.
This setup allows Nginx to act as an intermediary, forwarding requests from the host to the appropriate container running the FastAPI application.
Step 6. Bringing life and testing.
To get started, follow these steps:
- SSH into your instance and perform a `git pull` to fetch the latest changes of your codebase.
- If necessary, rerun the ansible playbook to ensure the system is properly configured.
- Set up your environment variables by creating a `.env` file. Copy the `.env-sample` file and fill it with your secrets and configuration values.
- Run the command `docker compose up` to start the services defined in your `docker-compose.yml` file.
If you encounter any issues during this process, or if you have updated your app image, you can take the following steps:
- Use `docker compose pull` to pull the latest version of the app image from the repository.
- Run `docker compose down` followed by `docker compose up` to stop and restart the services, ensuring that the latest image is used.
These commands help ensure that your system is up-to-date and running with the latest changes in your codebase and container images.
Step 7. Deployment script.
In Step 7, we focus on creating a deployment script to handle various tasks and automate the deployment process. This script helps address common issues and simplifies repetitive tasks. Here are some examples of what the deployment script can handle:
- Changing permissions and ownership: In cases where the same directory or file is mounted into different containers, there may be permission or ownership issues. The deployment script can ensure the correct permissions and ownership are set.
- Running commands from inside the container: To avoid polluting the host system, the deployment script can execute commands within the container, allowing access to application files and the isolated environment. For example, Drupal comes with a Drush (CLI) tool, that helps to automate certain tasks.
- Mounting volumes in multiple containers: In scenarios where you want to have custom code in one image and share it with another image, the deployment script can handle mounting volumes and prepopulating them with data from the source image. This avoids the need for separate custom packages and simplifies the deployment process. For example, you can have a custom PHP-FPM image (with your code-base) and you might need to serve some static files via NGINX image (a different web service).
For all of these issues, I decided to create a bash script that will solve all these repeating issues in 1 deploy.sh, with all the right comments and gotchas. Also, this is the script that will be triggered by the auto-deployment step from our CI/CD.
Script usually is in: ./app-settings/scripts/update-code.sh
You can always test it (or update your set-up) by just running it.
The deployment script, typically named deploy.sh or update-code.sh, and located in ./app-settings/scripts/, addresses these issues and provides comments and instructions to handle potential challenges. It serves as a comprehensive solution and can be triggered by the auto-deployment step in your CI/CD pipeline.
You can test the deployment script by running it manually or update your setup by incorporating it into your deployment process. The script streamlines the deployment workflow and ensures consistent and reliable deployments of your application.
Step 8. Adding CI/CD (Github Actions)
Step 8 focuses on adding CI/CD (Continuous Integration/Continuous Deployment) using Github Actions to automate the deployment process. Here's a breakdown of the steps involved:
- Create a private key: Generate a new private key specifically for the deployment process. Make sure to export both the private and public parts into a temporary folder (make sure not to override your main key)
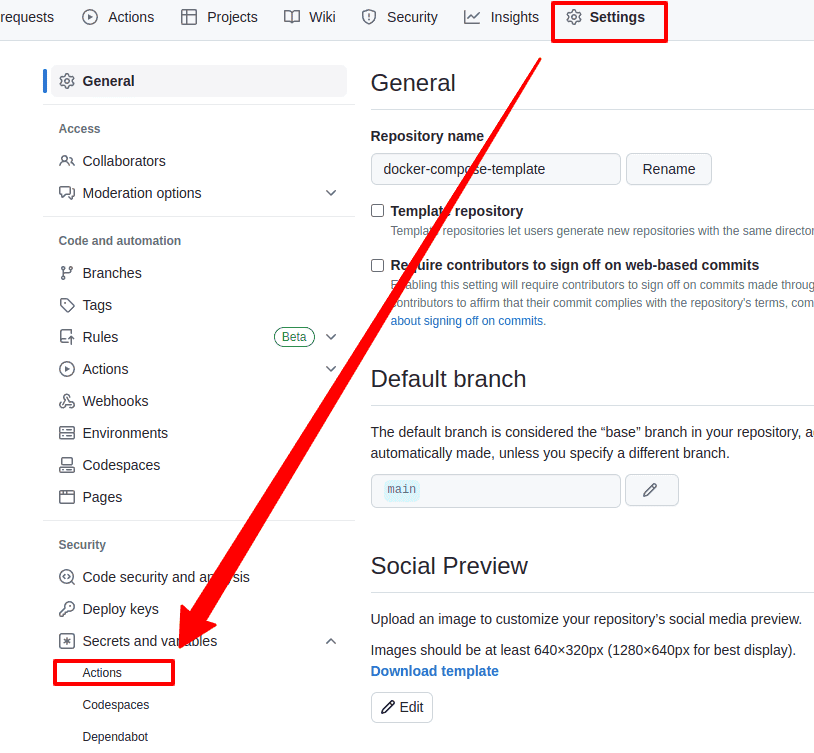
- Define secrets in Github repository: Go to the secrets settings in your Github repository and specify the following secrets:
- `HOST_DEV` - Host's IP address
- `PORT_DEV` - the SSH port open for connections
- `USERNAME_DEV` - the SSH username
- `PKEY_DEV` - the private key used to connect to the host
- Add public key to the server: Append the public key to the ~/.ssh/authorized_keys file on your server to enable authentication.
- Configure Github Workflow: Add the necessary steps in your Github Actions workflow file to SSH into the host and execute the update-code.sh script that we created in the previous step.
This script will handle pulling the latest image and performing other necessary tasks for code updates. Additionally, you can include cleanup steps to remove older packages, keeping only a specified number of sub-versions and ignoring major releases (in our case - 5).
Wrapping things up
Wrapping things up, there are a few additional aspects to consider:
Rollback: One advantage of this approach is that if you need to rollback your changes, you can simply replace the image in the docker-compose.override.yml file with the previous version and run the update-code.sh script. This will pull the correct artifact and roll back the system to the previous state.

image: ghcr.io/nikro/docker-compose-template-app:hash
Downtime: A potential drawback is the presence of a small amount of downtime when removing the old container and bringing a new one to life. This downtime typically lasts around 5-10 seconds or less. To handle this, the solution includes a placeholder.html file in the Nginx configuration on the host system. During the downtime, Nginx serves this placeholder page to ensure a smooth transition for users.
Mitigating Downtime with Blue-Green Deployment: To mitigate downtime further, you can implement a blue-green deployment strategy. This involves having two separate app services, such as app_blue and app_green, running on different ports (e.g., 8081 and 8082).
- Let’s suppose app_blue is currently live (means: nginx proxies from 80 to 8081)
- You pull the new image version: docker compose pull, then remove and update the app_green (which runs on 8082)
- Once everything is up and running, you switch your host nginx from proxy-ing to 8081 to 8082
- You clean-up and stop app_blue (if you want)
Maybe I’ll update the template repo with this example, but a bit later.
So that’s pretty much it - with these steps and considerations, you now have a relatively clean and easy way to deploy your services and manage different versions or flavors of those services.
💡 Inspired by this article?
If you found this article helpful and want to discuss your specific needs, I'd love to help! Whether you need personal guidance or are looking for professional services for your business, I'm here to assist.
Comments:
Feel free to ask any question / or share any suggestion!