Deep-dive into Drupal 8 + Gatsby.JS (Part 2)
Welcome to 2nd part - hands-on or deep-dive into Drupal 8 + Gatsby.JS. Don’t treat this article as a tutorial - but hopefully, my experience will be useful for your journey.
Who is it for? ?
If you’re a beginner that has some experience with Drupal (or even if you’re pretty new to it) - during some 3-4 days, you can have a full-running website, secured, fast, and with zero hosting costs. If you want to experiment, learn something new, create a professional or personal blog, a product landing page, a business website, you name it - then it’s for you.
How much time? ⌚
It really depends on your knowledge and skills. It took me 5-8 days, but I mostly did around 2-3 hours per day (maybe with a weekend spike), that’s why I consider it 3-4 days (full-time). It also depends on the approach and template you’ll choose.
Why? What are the Advantages? Etc. ❓
Most of these things are covered in the 1st article (aka part 1). But, to be short: Decoupled Drupal + Gatsby.JS combo offers a blazing fast website that looks and feels pretty dynamic, with a dynamic admin interface, editing experience, and no server costs, at the same time being able to handle almost any load. Sounds too good to be true? Don’t miss the 1st article then.
If you’re ready - let’s begin ?
Initial Setup
Docksal / Docker
We will be using this boilerplate repo - https://github.com/docksal/boilerplate-drupal-gatsby. It consists of Drupal, Gatsby, and Docksal (docksal is similar to pygmy (lagoon), or dd, or docker-compose - but it comes with a handy shell tool that glues everything together).
Note - that I’ll explain everything only from a Linux (Debian-like) perspective as that’s what I’m working with.
Make sure you have the following setup:
- Basics - install curl, git; make sure apache / nginx / pygmy, etc isn’t running (this is explained here)
- Install Docksal - normally if you follow the steps, this should auto-install docker as well.
Okay, now we can clone the repo - i.e. into /var/www/d8gatsby. Make sure you have some free space on the hard-drive and at least 8GB RAM in total - as this will create multiple docker containers.
Okay, you can see things are happening now. To make sure that everything’s fine you can run: fin status - you should get similar output:
If that’s the case - all good. Here’s what each container does:
- d8gatsby_cli_1 - this is the CLI container - you interact with Drupal and Gatsby through it;
- d8gatsby_db_1 - this is the DB container - with Drupal Database;
- d8gatsby_php_1 - this is the PHP container - runs PHP;
- d8gatsby_web_1 - this is the web-server - configured to run Drupal;
- d8gatsby_frontend_1 - this is the Gatsby container - it’s showing the ‘production’ version of the Gatsby build;
- d8gatsby_preview_1 - this is the Gatsby container - it’s showing the ‘dev’ version of the Gatsby build - with ‘live’ changes.
If you’re already familiar with Docksal - this repo adds some extra custom commands - check those out. Also, feel free to explore the .docksal/docksal.yml.
Drupal aka the CMS
Now let’s configure the CMS side - we need to do the following steps:
These commands will run composer install and update from within the CLI container. You can now navigate to: http://cms-d8gatsby.docksal/ and you should see an installation wizard for Drupal 8 (Note: the paths and the names of the containers depend on the folder name). I have chosen a Normal installation profile (not minimal) - so we can reuse the default defined fields and content-types.
By the way, you can also run fin init, instead of doing the wizard and all the following steps - and this will automatically install everything and wire things between them, but you will end up with an exact Umami installation profile and gatsby.js theme (like in the README file of the repo). This is not what I intend - instead, I want us to build our custom Gatsby theme and configure things manually - so don’t run fin init.
During installation - specify these details (default docksal mysql details):
- Database name: default
- Database username: user
- Database password: user
- Host: db
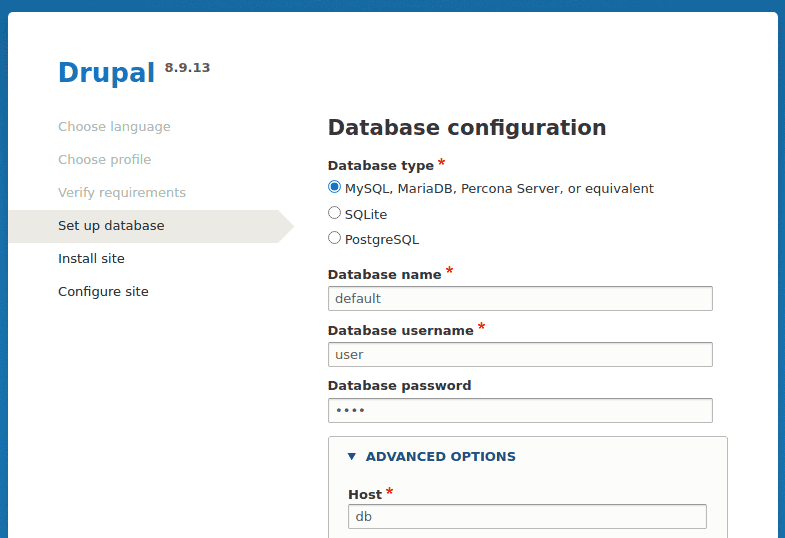
Don’t worry about production settings, these are temporary and only for local development (defined under settings.local.php).
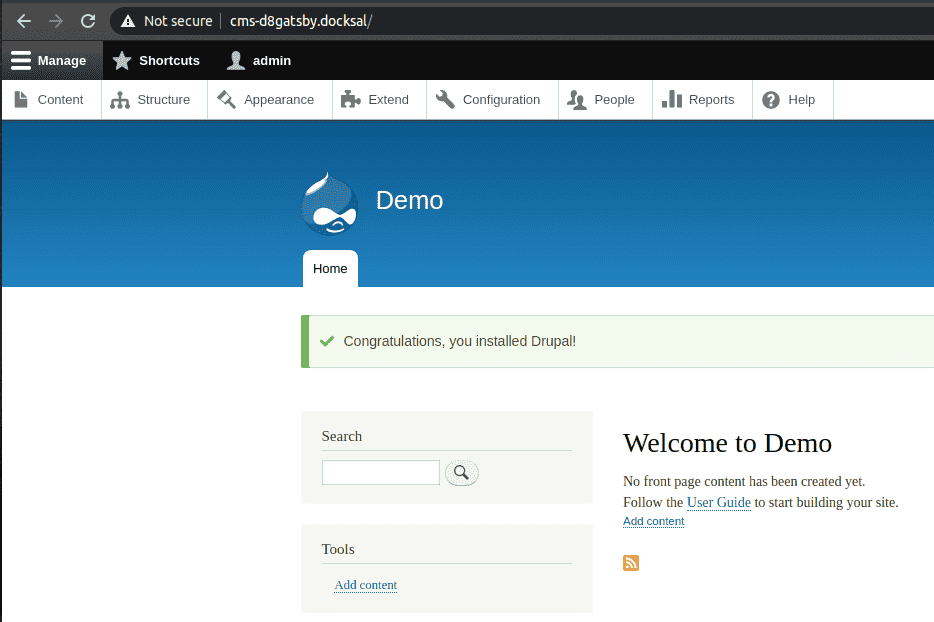
Once you’re done, you have to see a fully installed Drupal 8 instance:
Gatsby.JS aka Frontend
Let’s leave the CMS at this point and focus our attention on the Gatsby.JS (frontend) side.
Because we have deliberately chosen not to go with the default setup - building the frontend as-is - will fail, but let’s see how it fails:
This will initialize the code (run npm install, etc). And after, this we run the build command to build it:
You will see that it will fail - because currently our CMS doesn’t have any extra module installed, but the current Gatsby setup tries to query the JSON API and fails with http error message - 404.
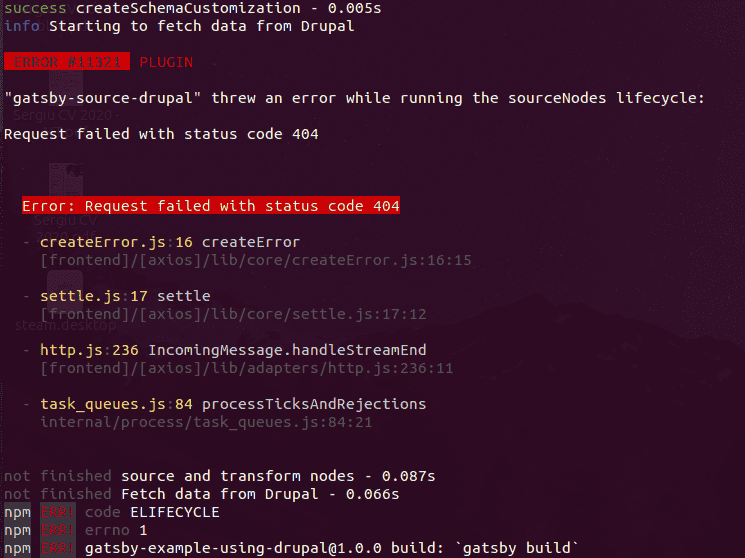
Don’t worry, we’ll remedy this in a section below when we’ll be building our custom Gatsby ‘theme’.
To sum-up: Drupal’s up and running, Docksal is up and running too, Gatsby isn’t but that’s what we’ll have to work on - we’re good to continue…
Basics (of Gatsby.JS)
If you’re new to Gatsby.JS - this section might be useful for you, however, if you’re familiar with it, feel free to skip to the next section.
Version
I will be using the latest 2.x - because 3.0 was released a couple of days ago and most probably community plugins we’ll be using aren’t perfectly polished for the 3.x version. But if you’re curious about 3.x - here’s what you can do:
Version 3.x’s structure doesn’t differ from version 2, but there are some breaking changes between the 2 versions - see here.
Install & Update
Let’s analyze the frontend/package.json - and adjust accordingly. Feel free to change the values of keys: name, description, author.
Now we can run these, install and update all of the packages:
Done...
Structure ?
Now let’s get to the anatomy of the Gatsby folder:
- packages.json - this is where we install / require all of the node packages;
- gatsby-config.js - this is where we configure all of the packages defined in packages.json;
- gatsby-node.js - this is where we can override default node methods - usually used to create routes dynamically - i.e. create a page for every Drupal Node (and use a specific template);
- /src/* - this is the source folder, which contains templates for pages, components, and various utilities that you will need. Right now it’s filled with files that match the Umami setup - we will clean those up and replace them with ours.;
- others - here you can see the other important folders that are missing in the original setup.
Let’s also go over the src folder - current structure is just a suggestion used by Alexei, but let’s explore it:
- src/components - contains reusable react components;
- src/layouts - contains pages layouts;
- src/templates - contains templates, that dress up pages (such as Drupal Node Pages);
- src/pages - contains the pages themselves, i.e. frontpage, view pages, static pages, etc;
- src/utils - contains reusable code-snippets, just to keep things clean;
Explore
Feel free to click around and explore ready-made components, templates, pages, etc.
“Theme” setup
Now that we’re familiar a bit with Gatsby’s structure - let’s explore the ways we can implement our theme. There are many ways to do that:
- Gatsby Starters - there’s a huge library of Starters out there - these are ready-made Gatsby websites, of course they differ in quality, some are well sliced into components, properly documented, and pretty generic, other ones are less. Here’s a good example - and the source. If you’ll look into the source - you will see familiar file structure - feel free to explore these.
- JAM Stack Themes - https://jamstackthemes.dev/ - here you can explore various JAM stacks and Gatsby is one of them. Most of the content will be similar to the one found in Gatsby Starters, but you can still find some unique content.
- Manual - hand-craft your own theme by slicing it up in components and re-using those properly. React-based themes that are already sliced-up and ready-to-use would fit the best.
However, even if you pick the best approach - a Gatsby Starter - it probably wasn’t designed to work with Drupal. That’s exactly the case that happened with me - I have picked this template (which was inspired by this template for Jekyll apparently). If you open gatsby-node.js you can see that it’s trying to query allMarkdownRemark - meaning markdown files.
Eventually, you’ll need to do a smooth transition (that almost never goes smooth) from the template that we have in the frontend folder, to the one you want to end-up with. Here’s what I did:
-
Compare both package.json files: original and the wanted one. You will need to slowly go line-by-line and do a manual conscious merge of these packages. In my example, I had to ignore all the remark packages and fix the versions for compatibility - and then run an `npm install` and `npm update` to make sure everything’s fine.
-
Compare both gatsby-config.json files - follow a similar logic, you don’t want to enable and configure the remark plugins, but you want to have `gatsby-plugin-react-helmet` and `gatsby-plugin-sass` enabled.
-
I stashed Alexei’s `/src/*` files and copied over the ones provided by the wanted theme. Stashing his files away was useful as I wanted to re-use some of the logic and components that he created - especially the GraphQL Fragments.
-
I have altered the default /src/ folder by adding 2 more folders: assets & utils.
-
Next - is the challenge of getting a some-what working build:
- We need to check all GraphQL queries in the components - make sure they are either empty or resemble something like this:
- export const pageQuery = graphql`
- query {
- site {
- siteMetadata {
- title
- }
- }
- }
- `
-
We need to comment-out the contents of these functions in gatsby-node.js: exports.onCreateNode, exports.createPages, exports.createSchemaCustomization.
-
Now go to Drupal and enable these modules (here: http://cms-d8gatsby.docksal/admin/modules )
- JSON API (and dependencies)
- Gatsby JSON API Extras (and dependencies)
-
Now, we can try and run: fin fe/build - if the build is somewhat successful - you will see time stats (“... Done building in 20s”). If it’s not - you got to go and investigate the issue - probably need some more commenting out.
-
You can now open your browser and navigate to GraphiQL (GraphQL Explorer): http://preview-d8gatsby.docksal/___graphiql
-
If everything went right, you’ll be able to see the GraphQL prepopulated with data from Drupal (example below has a bit more data than you should see in your case):
- We need to check all GraphQL queries in the components - make sure they are either empty or resemble something like this:
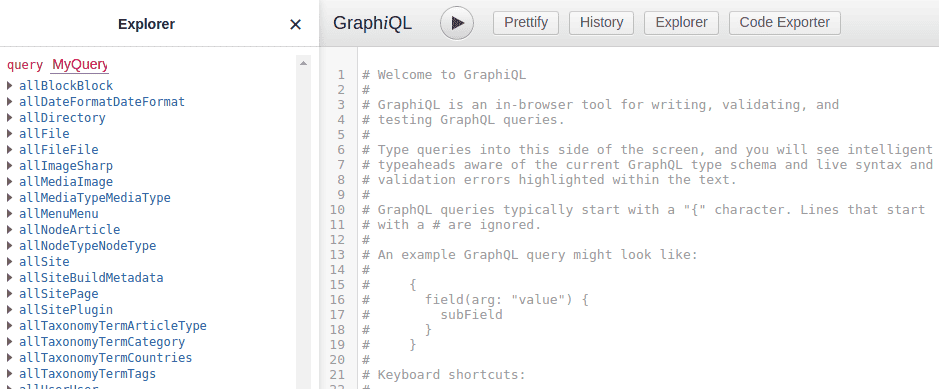
Awesome! Now you have the link established between Drupal and Gatsby - data is flowing and you can query it and explore it through GraphiQL.
Now, let’s model the Drupal data.
Drupal Setup & Bridge
If you haven’t already enabled JSON API and Gatsby JSON API modules (and their dependencies) - please do. The bridge between Drupal and Gatsby is established via JSON:API - on the Drupal side; and “gatsby-source-drupal” - on the Gatsby side.

So now you can do the following things:
- Make Drupal sexy - download a nice administrative theme and configure it. I’m usually going with Adminimal - but you can either choose Gin, Claro, or stick with Seven.
- Define your structure - as we’re using the default install profile, you have Articles and Basic Page. You’re the ‘chef’ of your blog, i.e. you may add some fields, maybe some field groups, and properly structure everything.
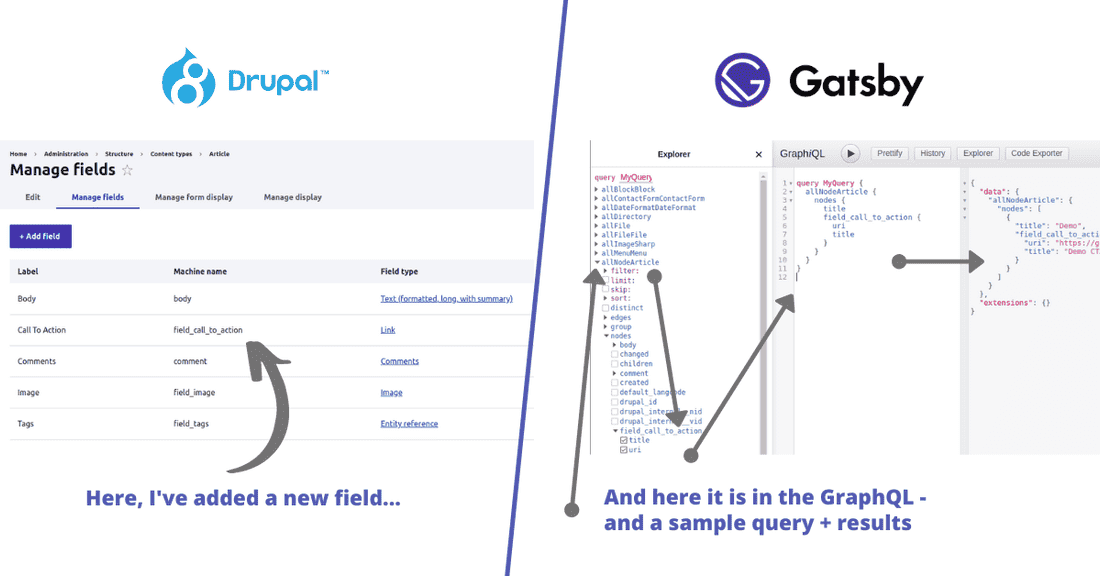
Once you modified your structure, make sure you have at least 1 node of each content-type created, with all the fields - otherwise, the GraphQL will have missing properties. OK, now you can run the: fin fe/build again (if that won’t work, run: fin restart preview), and once it’s done, re-check your GraphiQL URL. And you can now see the changes populated in GraphQL.
In the example above you can see that I’ve added a “Call to Action” field (link) - and that it translated to GraphQL nicely - and you can see my Demo node listed as the query result.
GraphiQL - querying data
If you’re new to GraphQL, check out this page. Don’t focus on defining schemas or doing mutations or creating GraphQLs from scratch - all you need to focus on are queries. Experiment using GraphiQL and get results instantly.
Once you feel more or less confident - dig deeper and explore Fragments. Check-out the given example (hope you commented it out earlier and didn’t remove it) and try to understand how fragments are used - to get around deep trees that Drupal creates.
Here are some of my fragments that I’ve generated for my blog.
Now the last bit, altering schema - remember how I said above that we need to create at least 1 node of a given content-type with all the fields? Also, you’d have to create at least 1 user (but we have the admin, so duh) and the terms, etc.
If you open gatsby-node.js you can see some of the predefined schema extras (just a snippet):
Understanding and extending this customization was a headache to me - basically, it allows you to define some fields that aren’t yet populated, some dynamically renamed, computed, etc - in GraphQL. Very handy but hard to get your head around. Here’s my take on it, but I pretty much gave up ?
Work - Putting it all together
Made it this far? Great! Phew - okay, let’s move on.
Now we have to put everything together and build the theme. If you never worked with Gatsby - I recommend you go through a quick-start guide or do their first tutorial (make sure your version matches the one of the documentation -> version-switch is in the top-right corner).
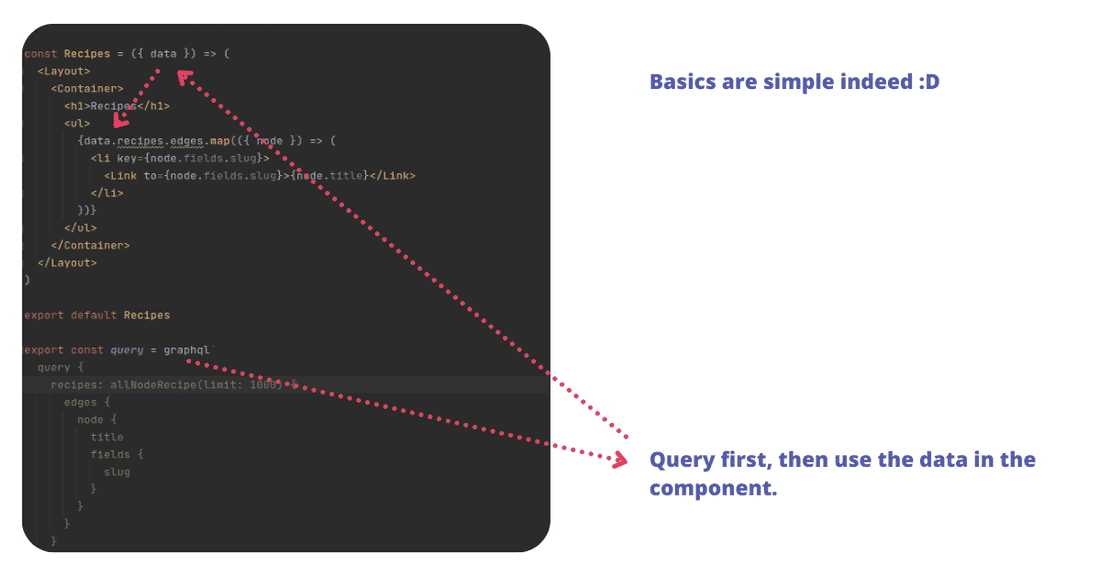
In the nutshell - each page or template consists of 2 parts: React part (render logic) and GraphQL page query part:
One of the trickiest parts is to alter the gatsby-node.js to our liking - this is where all the ‘pages’ get dynamically created. For example - if we want to create 1 page for every Article and 1 page for every Basic Page, we have to do it here. If we want to create a page per Taxonomy Term (and of a specific vocabulary maybe) - rules have to be defined here as well. And if you want to have a “homepage” with pagination - the rules for all of those, have to live here as well.
You can start by going through official documentation (here’s v2) - and also by analyzing the existing gatsby-node.js or my version (I preserved and repurposed the existing version).
I won’t cover the details, as examples are pretty self-explanatory - but here’s my take on it:
I only create pages for each Article, Term, and 1 custom page with a custom template. However, you can see that a bit above in createArticlePages - I also create the blog-list (homepage) and I create paginations as well. Note that we’re using templates so variables that are defined in createPage - get passed down as GraphQL parameters.
Now you can:
- Query data from Drupal;
- Create pages and use templates;
- Create templates and components - with components be as granular as you can, as this is the best practice;
One more thing - check-out my quick-and-dirty approach of replacing the inline images by using this file. I basically force Drupal to use full image URLs inside the body and then I can scan the text during the build process, fetch ALL of the files from Drupal, and replace those with ‘Gatsby’ images. There are other ways you can go with that - but I like to use the default Gatsby images - as they fade-in nicely and are mobile-optimized.
It’s time to put everything together to have a properly functional theme. I know it ain’t easy - but what is? It greatly depends on the initial theme you picked.
What else is left to cover?
- Metadata - make sure you have the facebook preview, twitter preview, etc.
- Contact forms - if you’re interested in having a contact form - you can use a third-party service such as GetForm.io - here’s an integration guide.
- Search - I use Algolia and there’s an integration plugin - and here’s a guide. It’s not super easy, but the results are very nice. Basically what happens is - during the build process, the index data is generated and sent to Algolia, and then it’s used to show results dynamically on your website. As a demo - check-out the search on the left side.
- Feed - a blog has to come with an RSS feed - there’s a plugin for that.
- Comments - for comments you can either use Facebook Comments or Disqus.
- Sitemap - bots like sitemaps, it’s their favorite snack, there’s a plugin for that.
If you want to fork my implementation or explore it - here’s the direct link to the repo (a ? would be appreciated).
If I missed anything - let me know in the comments below.
Deployment - Going Live
The simplest way to deploy your website live - is to use Netlify. Netlify basically takes your source code (from Github / Bitbucket / etc) and runs the build process in the cloud and then deploys the static output to their own hosting (not sure if it doubles as a CDN but I think so).
It’s free - but there’s a catch, they will eventually ask your credit card details and once your website grows big enough and a build process takes more and more time - you will use-up their free minutes’ allowance and they will automatically charge your card (or, take your website offline). Also, Netlify has a cap on a build process (around 20 minutes) - so if your build takes more than 20 minutes, it will eventually die.

My personal blog and some other smaller websites I did - never surpassed that limit, however, I had trouble with one site (and I got charged, a thing I didn’t like). So I ended-up using CircleCI - as they offered a better deal (free deal ?) - the website was building faster and they did offer more minutes allowance. Once CircleCI builds the website, it can then use Netlify CLI to push it to Netlify.
Where is Drupal stored? Well in my case it’s a little private server - but in your case, it can be anything, as long as it’s accessible by the building tool (Netlify / CircleCI) during the build process. This usually means that it can be stored either on your laptop, desktop, an AWS EC2 instance (you can turn it on only when you’re editing / writing - so a free tier one will be enough), hell, probably a RaspberryPi will do too.
Upcoming topics
This article already is way too long, I’m planning to create few smaller ones that will cover some of the things that I skipped here:
- CircleCI script as a workaround Netlify’s limitation (the “Deployment Less Simple” version from above);
- Cloudflare Pages - Exploring Netlify alternatives;
- Redirects - integrate Gatsby.JS routing with Drupal's redirect system.
Done - you can view the article here. - Previews - the ones offered by the Gatsby Cloud and the ones you can ‘bake’ yourself, as a part of the Docksal setup;
Done - you can view the article here.
Phew, did you get all the way here? Wow! ? Congratulations! ?
If you could share this article, maybe post a comment, and tell us a bit about your experience or project that you started - that would be fantastic! Thanks!
💡 Inspired by this article?
If you found this article helpful and want to discuss your specific needs, I'd love to help! Whether you need personal guidance or are looking for professional services for your business, I'm here to assist.
Comments:
Feel free to ask any question / or share any suggestion!